

Posted on May 28, 2026 at 01:35 pm
Yoga magazineQ archives The series is a curated collection of articles originally published in previous issues beginning in 1975. This article on Pyramid Pose (Parsvottanasana) first appeared in the November 2008 issue of Yoga magazine.
Parsvottanasana (also known as Intense Lateral Stretch or Pyramid Pose) simultaneously stretches the hamstrings and opens the shoulders — two actions that will improve your yoga practice and increase mobility in your daily life. Acumen is required to make progress in both areas, which sometimes seem to be in conflict.
When you follow the forward bend side Attitude (which lengthens the hamstrings) With so much enthusiasm that your shoulders roll forward and your chest collapses, you’ve missed an excellent opportunity to increase range of motion in your shoulders and counter some of the postural habits promoted by our increasingly computer- and car-based lives. Although Parsvottanasana contains a forward bend, it is greatly improved by weaving in a backbend element: maintaining length along the front of your body.
The marriage of opposites, of course, is central to the big picture of hatha yoga, which is often defined as the union of opposing solar and lunar energies. You also need to find a balance between freedom and stability in Parsvottanasana. The freedom you can find in your upper body as you extend your spine and open your shoulders is greatly facilitated by the stability of your base and the strength of your legs. As you explore the pose, embrace its duality.
Your physical harmony will improve, and with the liberating effects of embodying opposites, you may experience energetic harmony as well.
How to set up your base in pyramid pose
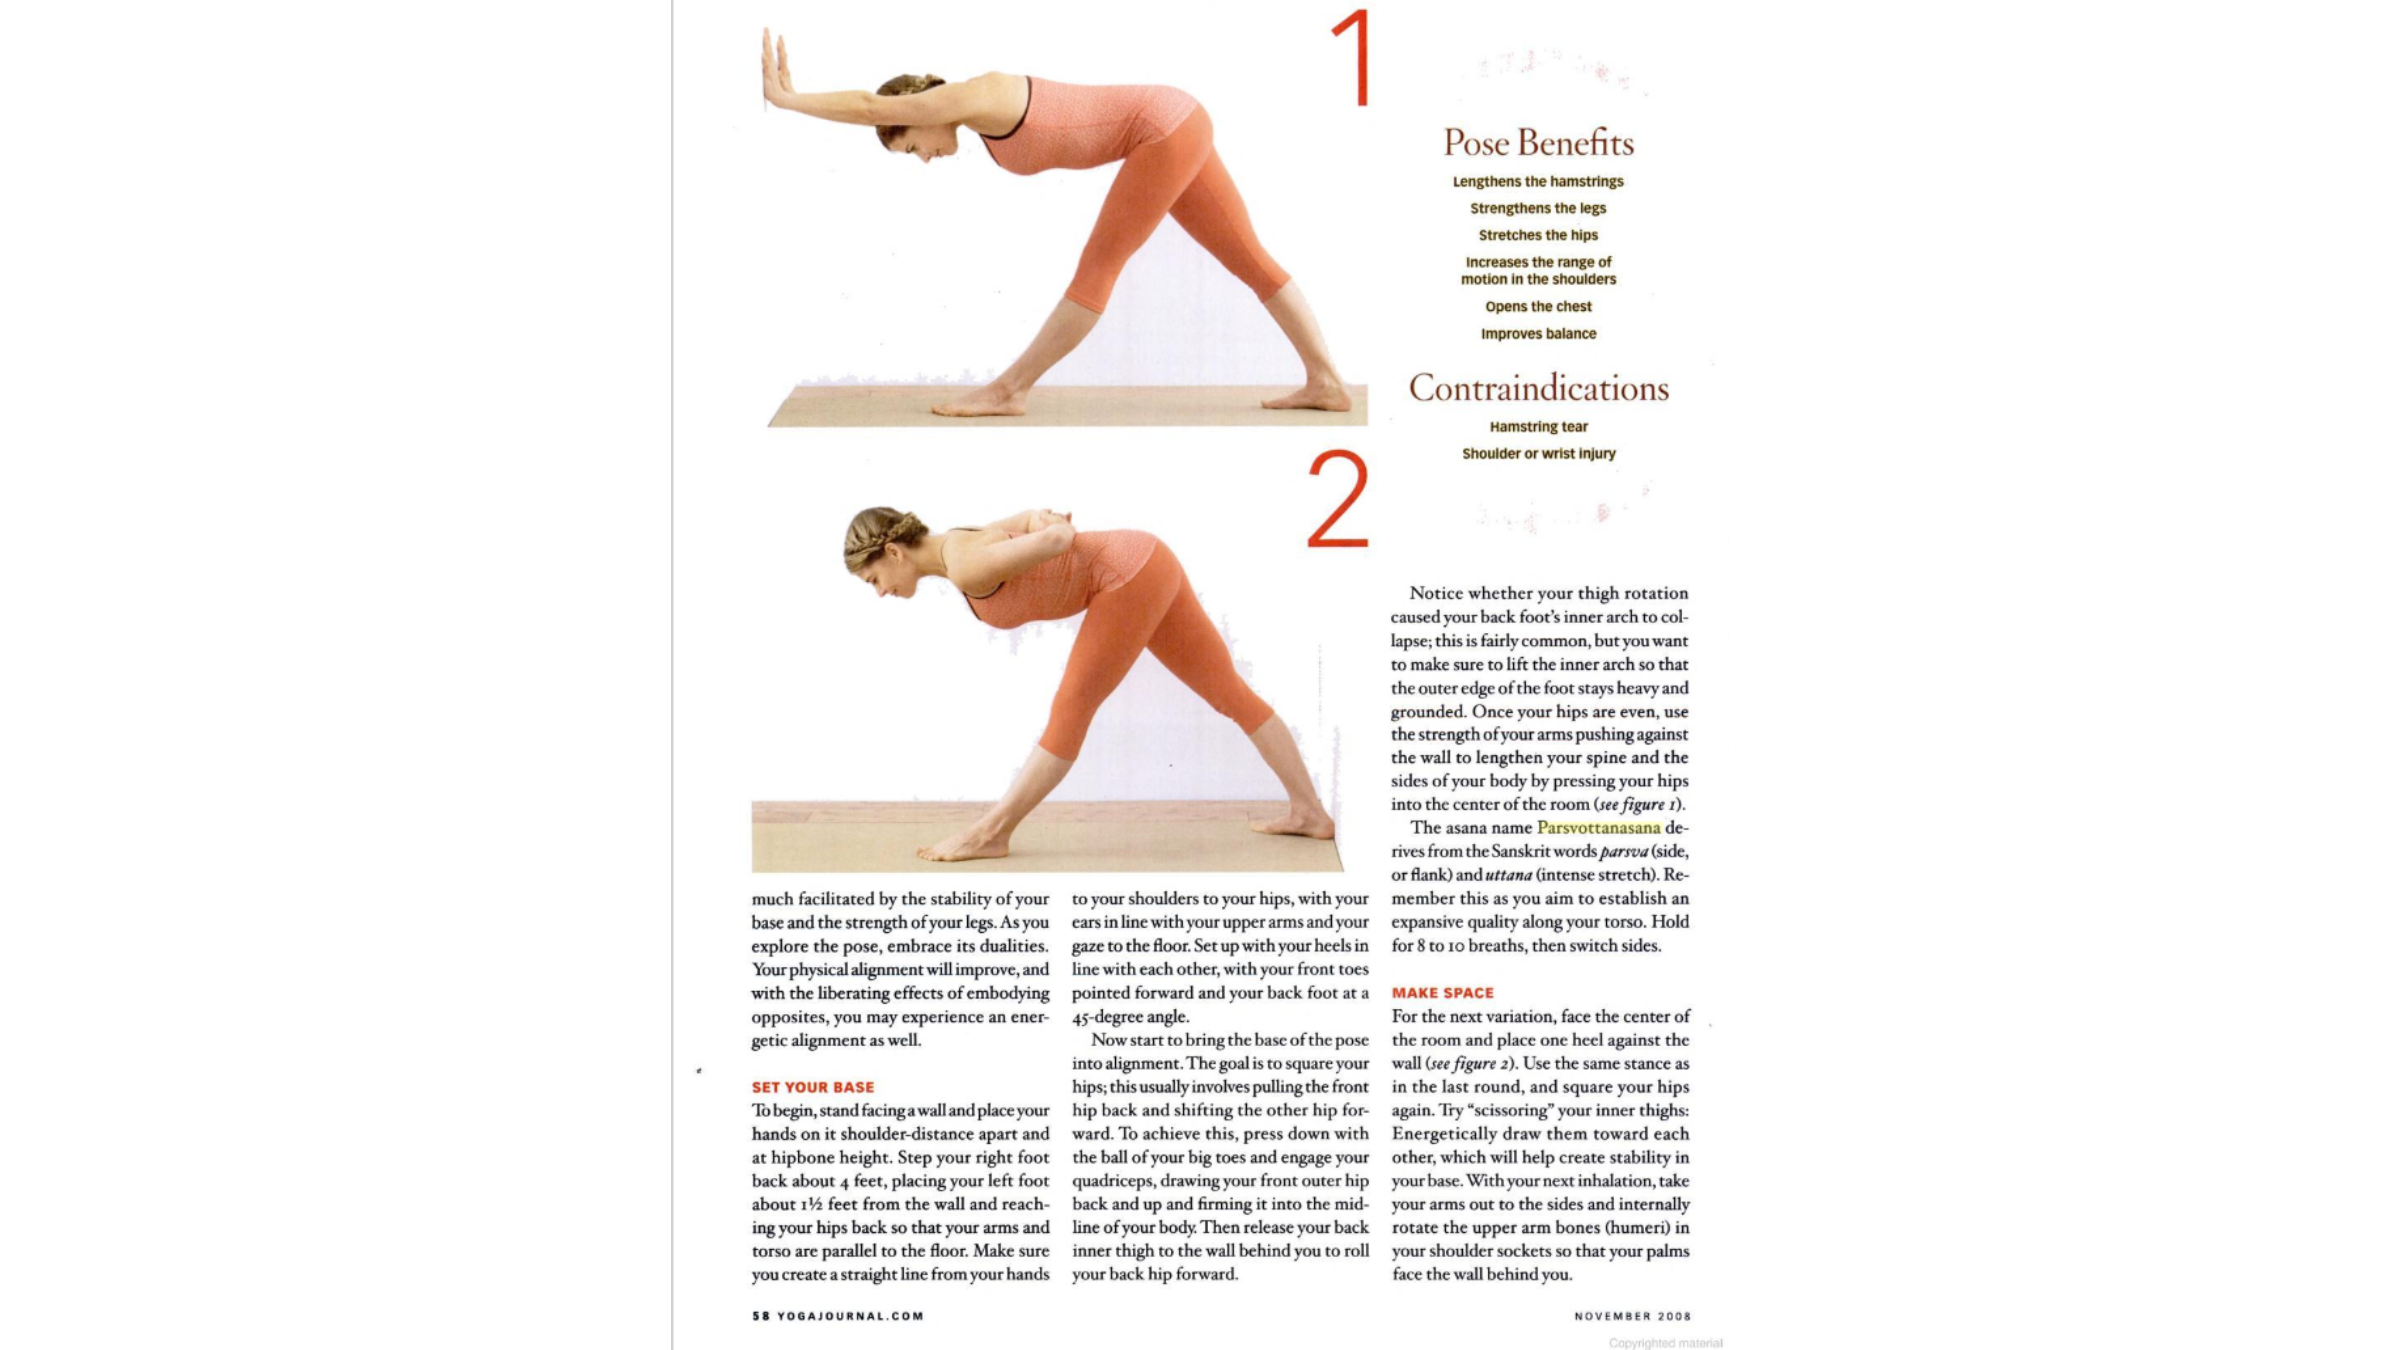
To start, stand facing a wall and place your hands on it at shoulder distance and hip bone height. Step your right foot back about 4 feet, place your left foot about 1½ feet from the wall and reach your hips back so your arms and torso are parallel to the floor. Make sure to create a straight line from your hands to your shoulders to your hips, with your ears in line with your upper arms and your gaze to the floor. Set up so your heels are in line with each other, with your front toes pointing forward and your back foot at a 45-degree angle.
Now start aligning the base of the pose. The goal is to square your hips. This usually involves pulling the front hip back and moving the other hip forward. To accomplish this, press down with the ball of your big toes and engage your quadriceps, pulling your front outside hip back and up and locking it into the midline of your body. Then release your back inner thigh to the wall behind you to roll your back hip forward.
Notice if your hip rotation has caused the inner arch of your back foot to collapse; This is fairly common, but you want to make sure the inner arch is lifted so that the outer edge of the foot remains heavy and stable. Once your hips are level, use the strength of your arms to press against the wall to lengthen your spine and sides of your body by pressing your hips into the center of the room (see Figure 1).
The name of the asana Parsvottanasana is derived from the Sanskrit words parsva (side or wing) and uttana (extreme extension). Remember this when aiming to create an expansive quality along your torso. Hold for 8 to 10 breaths, then switch sides.
Make room
For the next variation, face the middle of the room and place one heel against the wall (see Figure 2). Use the same position as in the last round, and adjust your hips again. Try “cropping” your inner thighs: pull them firmly toward each other, which will help create stability in your base. On your next inhale, raise your arms out to the sides and rotate your upper arm bones (humerus) internally into your shoulder sockets so that your palms face the wall behind you.
As you exhale, make gentle fists and bring your knuckles together behind your back just below your shoulder blades.
When you do this, the heads of your shoulders may collapse forward, and your trapezius muscles may tighten. Instead of reinforcing this less-than-ideal position, pull the heads of the shoulders up and back and rotate the upper arms outward by rotating the inner arm toward the outer arm.
It won’t be an exciting movement, but the movement is important for developing range of motion in your shoulders. When you do this make sure there is no pain in your shoulders; If so, step back so you can ease your way into creating openness.
Inhale, and accentuate the space along and across the front of your body by lifting your sternum (breastbone) away from your navel and spreading your collarbones. On your next exhale, straddle your front leg, keeping your hips square and your shoulders up and off the floor.
Resist the urge to give in to gravity, which can cause your shoulders and chest to collapse. Instead, keep your core active by engaging your quadriceps, pulling your inner thighs toward each other, and pressing your back femur (thigh bone) firmly toward the wall behind you so that your heel is pinned between the floor and the wall to secure the pose. Make the crown of your head an extension of the length of your spine, so that your entire neck is long and your gaze is toward your big toe. Hold for 8 to 10 breaths, then switch sides.
Search for union
For the classic version of the pose, move your rug to the center of the room. Standing in Tadasana (Mountain pose) At the front of the mat, place your hands on your hips, and feel your front hip bones pointing straight ahead like a pair of headlights.
Keeping your hips square, step right leg back 3½ to 4 feet, re-establishing the heel-to-heel alignment from the last rounds. To get maximum stretch in your spine, take a tall stance. To ensure your hips are square, activate your front thigh and pull your outside hip to the midline of your body. However, before moving your other hip forward, make sure your back foot is at a 45-degree angle, which will help protect your knee and align your hips. If the angle of your back foot is too open to the side, the knee will contract as you rotate your right hip forward to equalize it with the left.
On the other hand, if your toes are pointing too forward, you will have difficulty keeping the back heel down and will lose stability.
Now, point your back inner thigh into the wall behind you so that your hip rotates forward. Keep your tailbone heavy so that it stabilizes you. On inhalation, raise your arms out to the sides. As you exhale, rotate your arms and press your palms together behind your back. If you can, point your fingers upwards Prayer position.
Your shoulders may collapse forward immediately. Externally rotate your upper arms in their sockets, rotating your inner arm toward your outer arm so that your shoulders and chest rise.
With your next inhalation, reach your sternum away from your navel to open your heart. Keep your quadriceps and hips square.
As you exhale, stretch forward without shortening the front of your body. Look toward your left big toe with a soft but steady gaze. Stay rooted in your feet and legs and keep your hips engaged; Stability in your base will translate into greater freedom to extend your spine as well as more freedom to open your shoulders. A firm foundation will help you maintain your balance so you can focus on working your upper body.
There’s also a link between the firmness of your foundation and the spaciousness of your torso – you’re essentially flavoring your forward bend with an element of backbend when you strive for length along the front of your body. This is the union of opposites – the Yug, or yoke, which Yoga teaches us to inhabit.