
Published on June 14, 2026 at 05:49 AM
Yoga magazineQ archives The series is a curated collection of articles originally published in previous issues beginning in 1975. This article on How to Do the Plow Pose first appeared in the September/October 1985 issue of Yoga magazine.
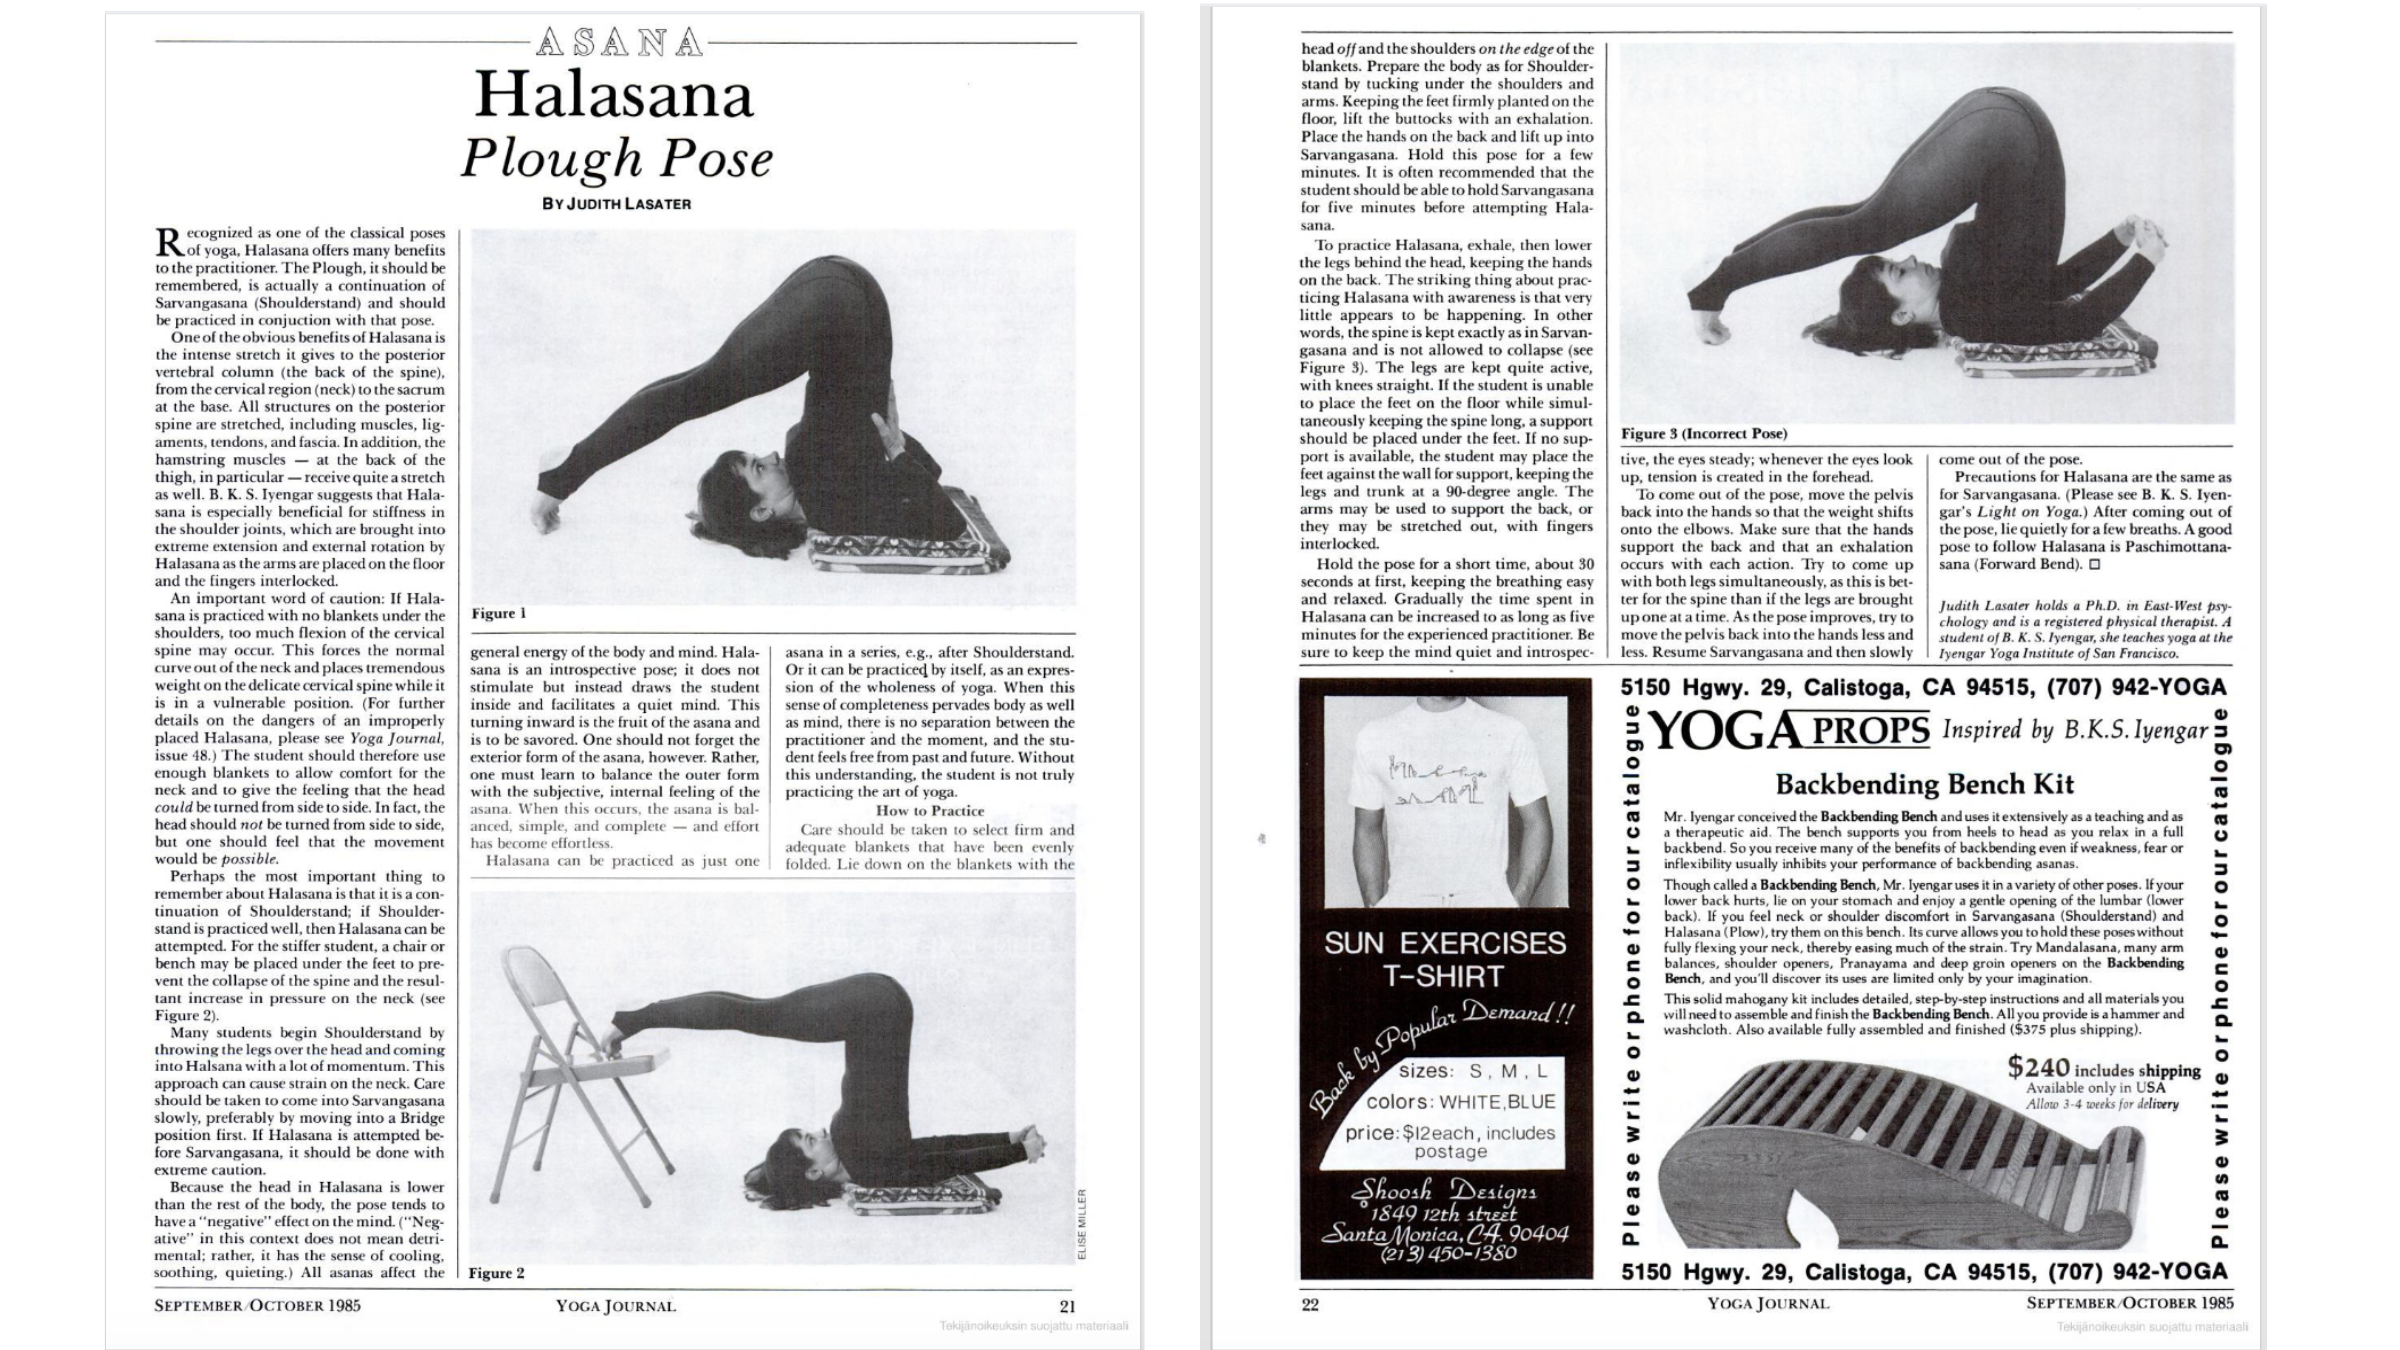
Recognized One of the most classic yoga posesHalasana offers many benefits to the practitioner. It must be remembered that the plow is actually a continuation of Sarvangasana (Shoulder holder) It must be practiced in conjunction with that position.
One of the obvious benefits of Halasana is the intense stretch it provides to the posterior spine (back of the spine), from the cervical region (neck) to the sacrum at the base. All structures in the posterior spine are stretched, including muscles, ligaments, tendons, and fascia. Additionally, the hamstring muscles — in the back of the thigh, in particular — receive a major stretch as well. BKS Iyengar suggests that Halasana is particularly beneficial for stiffness in the shoulder joints, which are brought to maximum extension and external rotation by Halasana in which the arms are placed on the floor and fingers interlaced.
An important word of caution: If Halasana is practiced without blankets under the shoulders, severe flexion of the cervical spine may occur. This takes the natural curve out of the neck and places tremendous weight on the delicate cervical spine while it is in a vulnerable position. Therefore, the student must use enough blankets to provide comfort to the neck and give the feeling that the head can be turned from side to side. In fact, the head should not turn from side to side, but it should be felt that movement will be possible.
Perhaps the most important thing to remember about Halasana is that it is a continuation of Schuldstand; If the shoulders are well practiced, Halasana can be tried. For the most hardened student, chair Or a seat can be placed under the feet to prevent collapse of the spine and the resulting increased pressure on the neck (see Figure 2).
Many students begin the shoulder stand by throwing the legs over the head and entering Halsana with great momentum. This approach can cause pressure on the neck. Care should be taken to enter Sarvangasana slowly, preferably by moving into an area Bridge position Firstly. If Halasana is attempted before Sarvangasana, it should be done with extreme caution.
Since the head in Halasana is lower than the rest of the body, the pose tends to have a “negative” effect on the mind. (“Negativity” in this context does not mean harm; rather, it has a cooling, soothing, calming sensation). All asanas affect the overall energy of the body and mind. Halasana is an introspective pose. It does not stimulate the student but draws him in and facilitates his calm mind. This turning inward is the fruit of the asana and should be enjoyed. However, one should not forget the external form of the asana. Instead, one must learn how to balance the outer form with the subjective inner feeling of the asana. When this happens, the asana becomes balanced, simple and complete, and effort becomes effortless.
Halasana can be practiced as just one asana in a series, for example, after the shoulder.
Or it can be practiced alone, as an expression of the perfection of yoga. When this feeling of wholeness spreads throughout the body as well as the mind, there is no separation between the practitioner and the moment, and the student feels free from the past and the future. Without this understanding, the student is not truly practicing the art of yoga.
How to practice plow pose
Make sure to choose firm, sufficient, and evenly folded blankets. Lie on the blankets with your head elevated and shoulders on the edge of the blankets. Prepare the body as if it were on the shoulders by tucking under the shoulders and arms. Keeping your feet firmly on the floor, lift your buttocks while exhaling.
Place your hands on the back and raise them into Sarvangasana. Maintain this position for a few minutes. It is often recommended that a student be able to hold Sarvangasana for five minutes before trying Halasana.
To practice Halasana, exhale, then lower the legs behind the head, keeping the hands on the back. The amazing thing about practicing halasana consciously is that very little happens. In other words, the spine is maintained exactly as in Sarvangasana and is not allowed to collapse (see Figure 3). The legs remain fully active and the knees are straight. If the student is unable to place his feet on the floor while keeping the spine tall at the same time, a brace should be placed under the feet. If support is not available, the student can place his or her feet against a wall for support, keeping the legs and torso at a 90-degree angle. The arms can be used to support the back, or they can be extended with the fingers interlocked.
To practice Halasana, exhale, then lower the legs behind the head, keeping the hands on the back. The amazing thing about practicing halasana consciously is that very little happens. In other words, the spine is maintained exactly as in Sarvangasana and is not allowed to collapse (see Figure 3). The legs remain fully active and the knees are straight. If the student is unable to place his feet on the floor while keeping the spine tall at the same time, a brace should be placed under the feet. If support is not available, the student can place his or her feet against a wall for support, keeping the legs and torso at a 90-degree angle. The arms can be used to support the back, or they can be extended with the fingers interlocked.
Hold this position for a short while, about 30 seconds at first, keeping the breathing easy and relaxed. Gradually, the time spent in Halasana can be increased to five minutes for an experienced practitioner. Check it out Keep the mind calm Introspection, eyes fixed; Whenever the eyes look upward, tension is created in the forehead.
To come out of the pose, move the pelvis back to the hands so that the weight shifts to the elbows. Make sure that the hands support the back and that exhalation occurs with each movement. Try to lift both legs at the same time, as this is better for your spine than lifting your legs one at a time. As posture improves, try to return the pelvis to the hands less and less. Resume Sarvangasana and then slowly exit the pose.
The precautions for Halasana are the same as for Sarvangasana. (Please see BKS Iyengar’s Light on yoga.) After coming out of the pose, lie quietly for a few breaths. A good posture to follow Halasana is Pashimutanasana (Bend forward).