Published on May 21, 2026 at 05:07 pm
Yoga magazineQ archives The series is a curated collection of articles originally published in previous issues beginning in 1975. This article about tight hips first appeared in the January-February 1999 issue of Yoga magazine.
There is an ancient Sufi story about the foolish philosopher Nasreddin, who was searching for the keys to his house under a streetlight. Some friends stopped by and joined the search.
Finally, in exasperation, a friend asked Nasreddin where he thought he lost the keys. Nasr al-Din pointed to a distant place where it was very dark. But why look here then? Asked. He replied: Because seeing under the light is much easier.
This story reveals a common human tendency: to look where we want rather than dig deeper to uncover the roots of the problem. This is true for some yoga students who are trying to move deeper into their forward bends.
She attends class regularly, sometimes for years, practices at home, and makes progress in most poses, except the forward bend. Looks like you have hamstrings of steel! No matter how often or how long you train, there doesn’t seem to be any change. One day while teaching, I realized that I was like Nasr al-Din. I’ve been looking in the wrong place to find a solution for some students who, no matter how many times or how long they practice, experience no change in their forward bend poses. I realized that, like the hamstrings, a group of muscles in the hip area — the external rotators — can interfere with the ability to bend forward.
These muscles are called the external and internal obturator, superior and inferior gluteus, piriformis, and quadriceps femoris, and are short, broad, and very strong. While each of these muscles is a separate structure, they function as one, serving to externally rotate the thigh bone (thigh), stabilize the pelvis while walking, and help stabilize the pelvis and femur together when you stand on one leg. When you bend forward, all the muscles on the back side of your body should lengthen, including the rotators.
A particularly important rounded part is the piriformis, which is attached to the sacrum and femur. The sciatic nerve passes directly under this muscle. A tight piriformis can do more than just limit forward bends.
Tight rotary problems
When a tight piriformis compresses the sciatic nerve, it can lead to “pyriformis syndrome,” which creates radiating pain in the buttocks, down the back of the thigh, to the leg and foot.
If this rotor is particularly tight, it can pull on the sacrum, affecting the functioning of the sacroiliac joint (the joint between the sacrum and the pelvis). When the sacroiliac joint is dysfunctional, the lumbar (lower) spine can also be negatively affected.
So, if your forward bends are limited, or if you suffer from “pyriformis syndrome,” it’s a good idea to continue working your hamstrings, but also include some rotator stretches into your regular asana routine. Note of caution: If leg pain is significant and/or persistent, it is recommended to seek treatment from a qualified health professional.
walk walk
Walking has a phase called the swing phase where you actually stand on one leg: one leg is the supporting leg and the other swings forward but has not yet landed. Because gravity tends to press the pelvis down, rotating devices are needed on the side of the standing leg to hold the head of the femur and the pelvis together in a stable position. The rotators tend to become tight when this action is exaggerated, such as when running or dancing.
To understand this concept, try an experiment. Place your fingertips on the front of your pelvis, slightly to the side of the bony prominence called the ASIS (anterior superior iliac spine). Walk across the room and notice how these bone landmarks are actually set in relation to the floor. This is because the rotators keep the pelvis stable while walking.
Now, keeping the hands still, raise your right leg in front of you as if you were about to take a step. Allow your left hip to swing to the left. The pelvis is now tilted downward on the right as the right rotors are relaxed. Place your right foot on the floor and perform this experiment on the other side.
Dancers and dancers
Dancers and runners usually have tight rotator muscles because they require more stability from these muscles. Dancers, for example, need stable rotators when standing on one leg and lifting the other leg up in an arabesque. They may be very flexible in other ways, but often have narrow rotors.
For runners, the increased momentum associated with the forward movement of the legs places greater demands on the rotators to keep the pelvis level.
Try this: Stand with your feet hip-width apart and your toes turned into the second ballet position. In order to turn the feet outward when standing, you can contract the external rotators to rotate the femur. If you hold them in this outer circular position as if they were taut, you will see how this interferes with forward bending. Firm your buttocks by pressing them together; Try leaning forward. Even if you are flexible, this will be difficult. On the other hand, if you turn the thighs inward, extending them instead of contracting the rotators, this will make it easier to bend forward.
Now turn your toes and thighs inward as much as possible. Imagine that you are pressing your heels outward but actually keeping your feet planted while bending. It will be much easier to bend forward with your legs and feet in this position. This is because the external rotators are extended and thus interfere less with the forward movement of the pelvis over the femurs.
Stretch Bed Reviews
The five roundabout stretches presented here are arranged in order of increasing difficulty. The benefits it brings to other poses, such as Uttanasana (Standing Forward Bend), as well as the ease of walking, make it worth doing frequently. Since these poses can be deep exercises even for experienced students, try them when you are already ready with your usual yoga practice or some other physical activity.
You may feel some of these stretches on one side more than the other. In fact, the longer you practice yoga, the more aware you will become of the differences between your right and left sides. You may want to extend the narrow side longer.
After each stretch, walk around the room to relax the rotators. You may find that walking becomes easier as the rotators relax. Try practicing forward bends to see how you change. You may also notice an improvement in Padmasana (Lotus Pose). We hope these notes encourage you to make these asanas part of your regular asana practice.
5 positions to stretch your rotator cuff muscles
Extensions are displayed in order of increasing difficulty. With each pose, keep the breathing soft and gentle and use the exhale when making large movements.
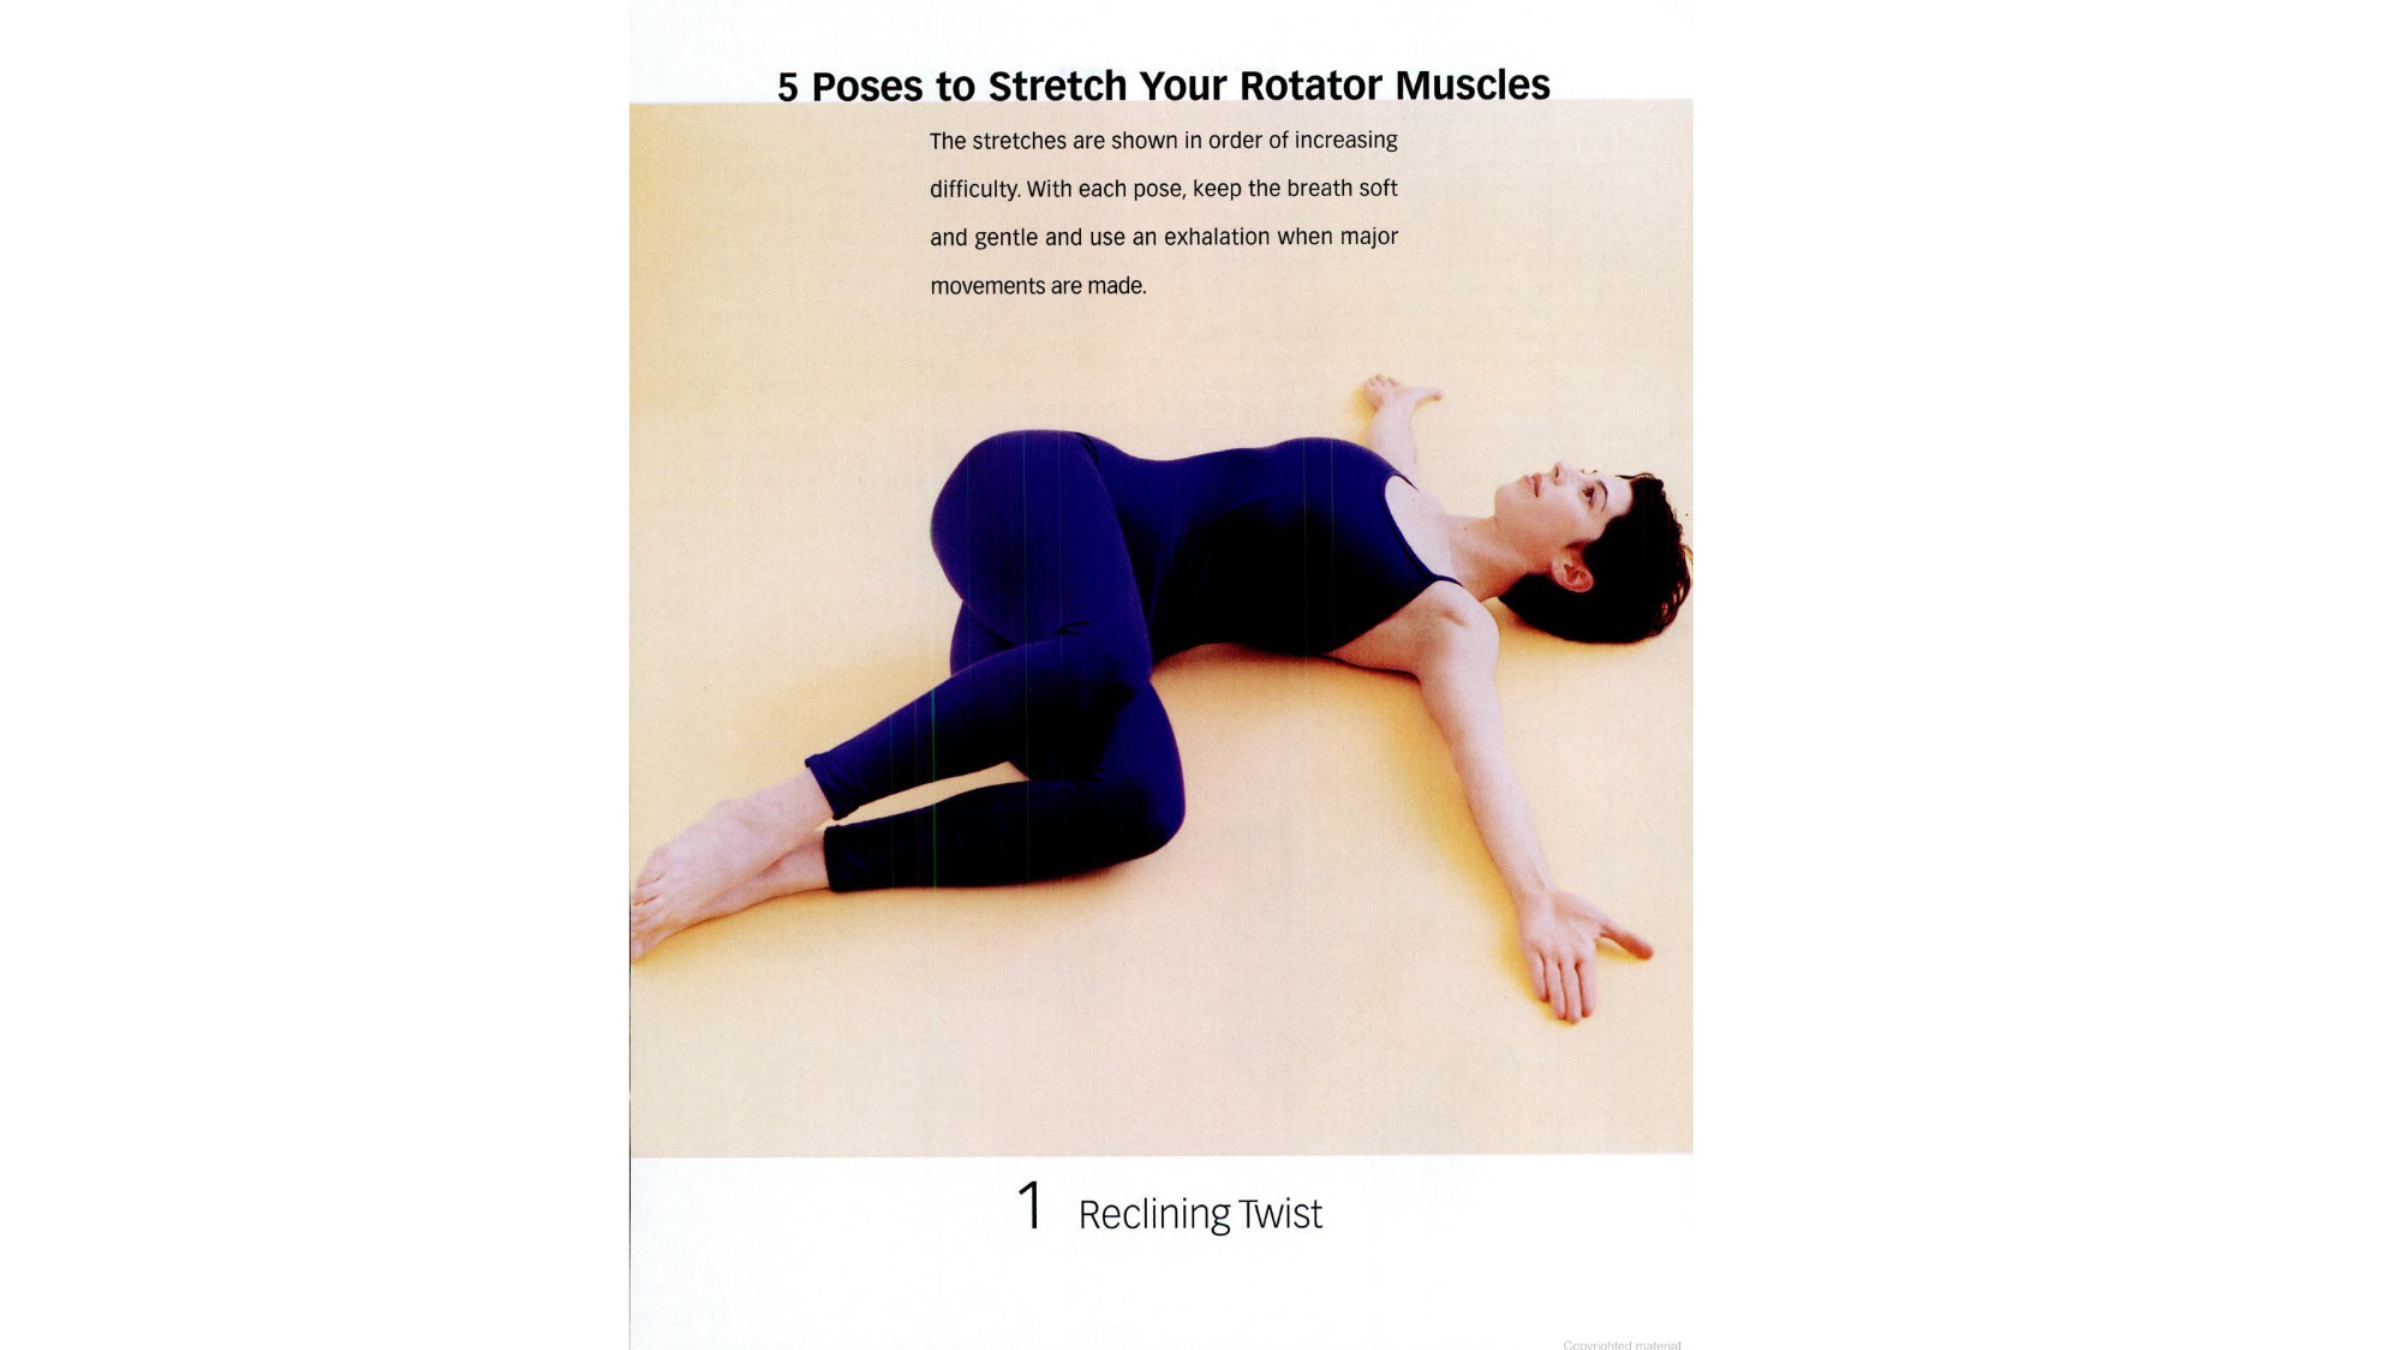
1. Reclining twist
How to: Lie on your back and bend your knees so that your feet rest on the floor. Inhale. As you exhale, slowly bring the knees to the chest one by one so that the lower back remains firmly on the floor.
Press your knees together and drop them to the left, keeping your shoulders on the floor. The legs should be at about a 90-degree angle to the body, but try to find a position that maximizes extension of the outer hips (especially the right). While holding the pose, imagine your belly rotating in the opposite direction to your legs. Repeat on the other side.
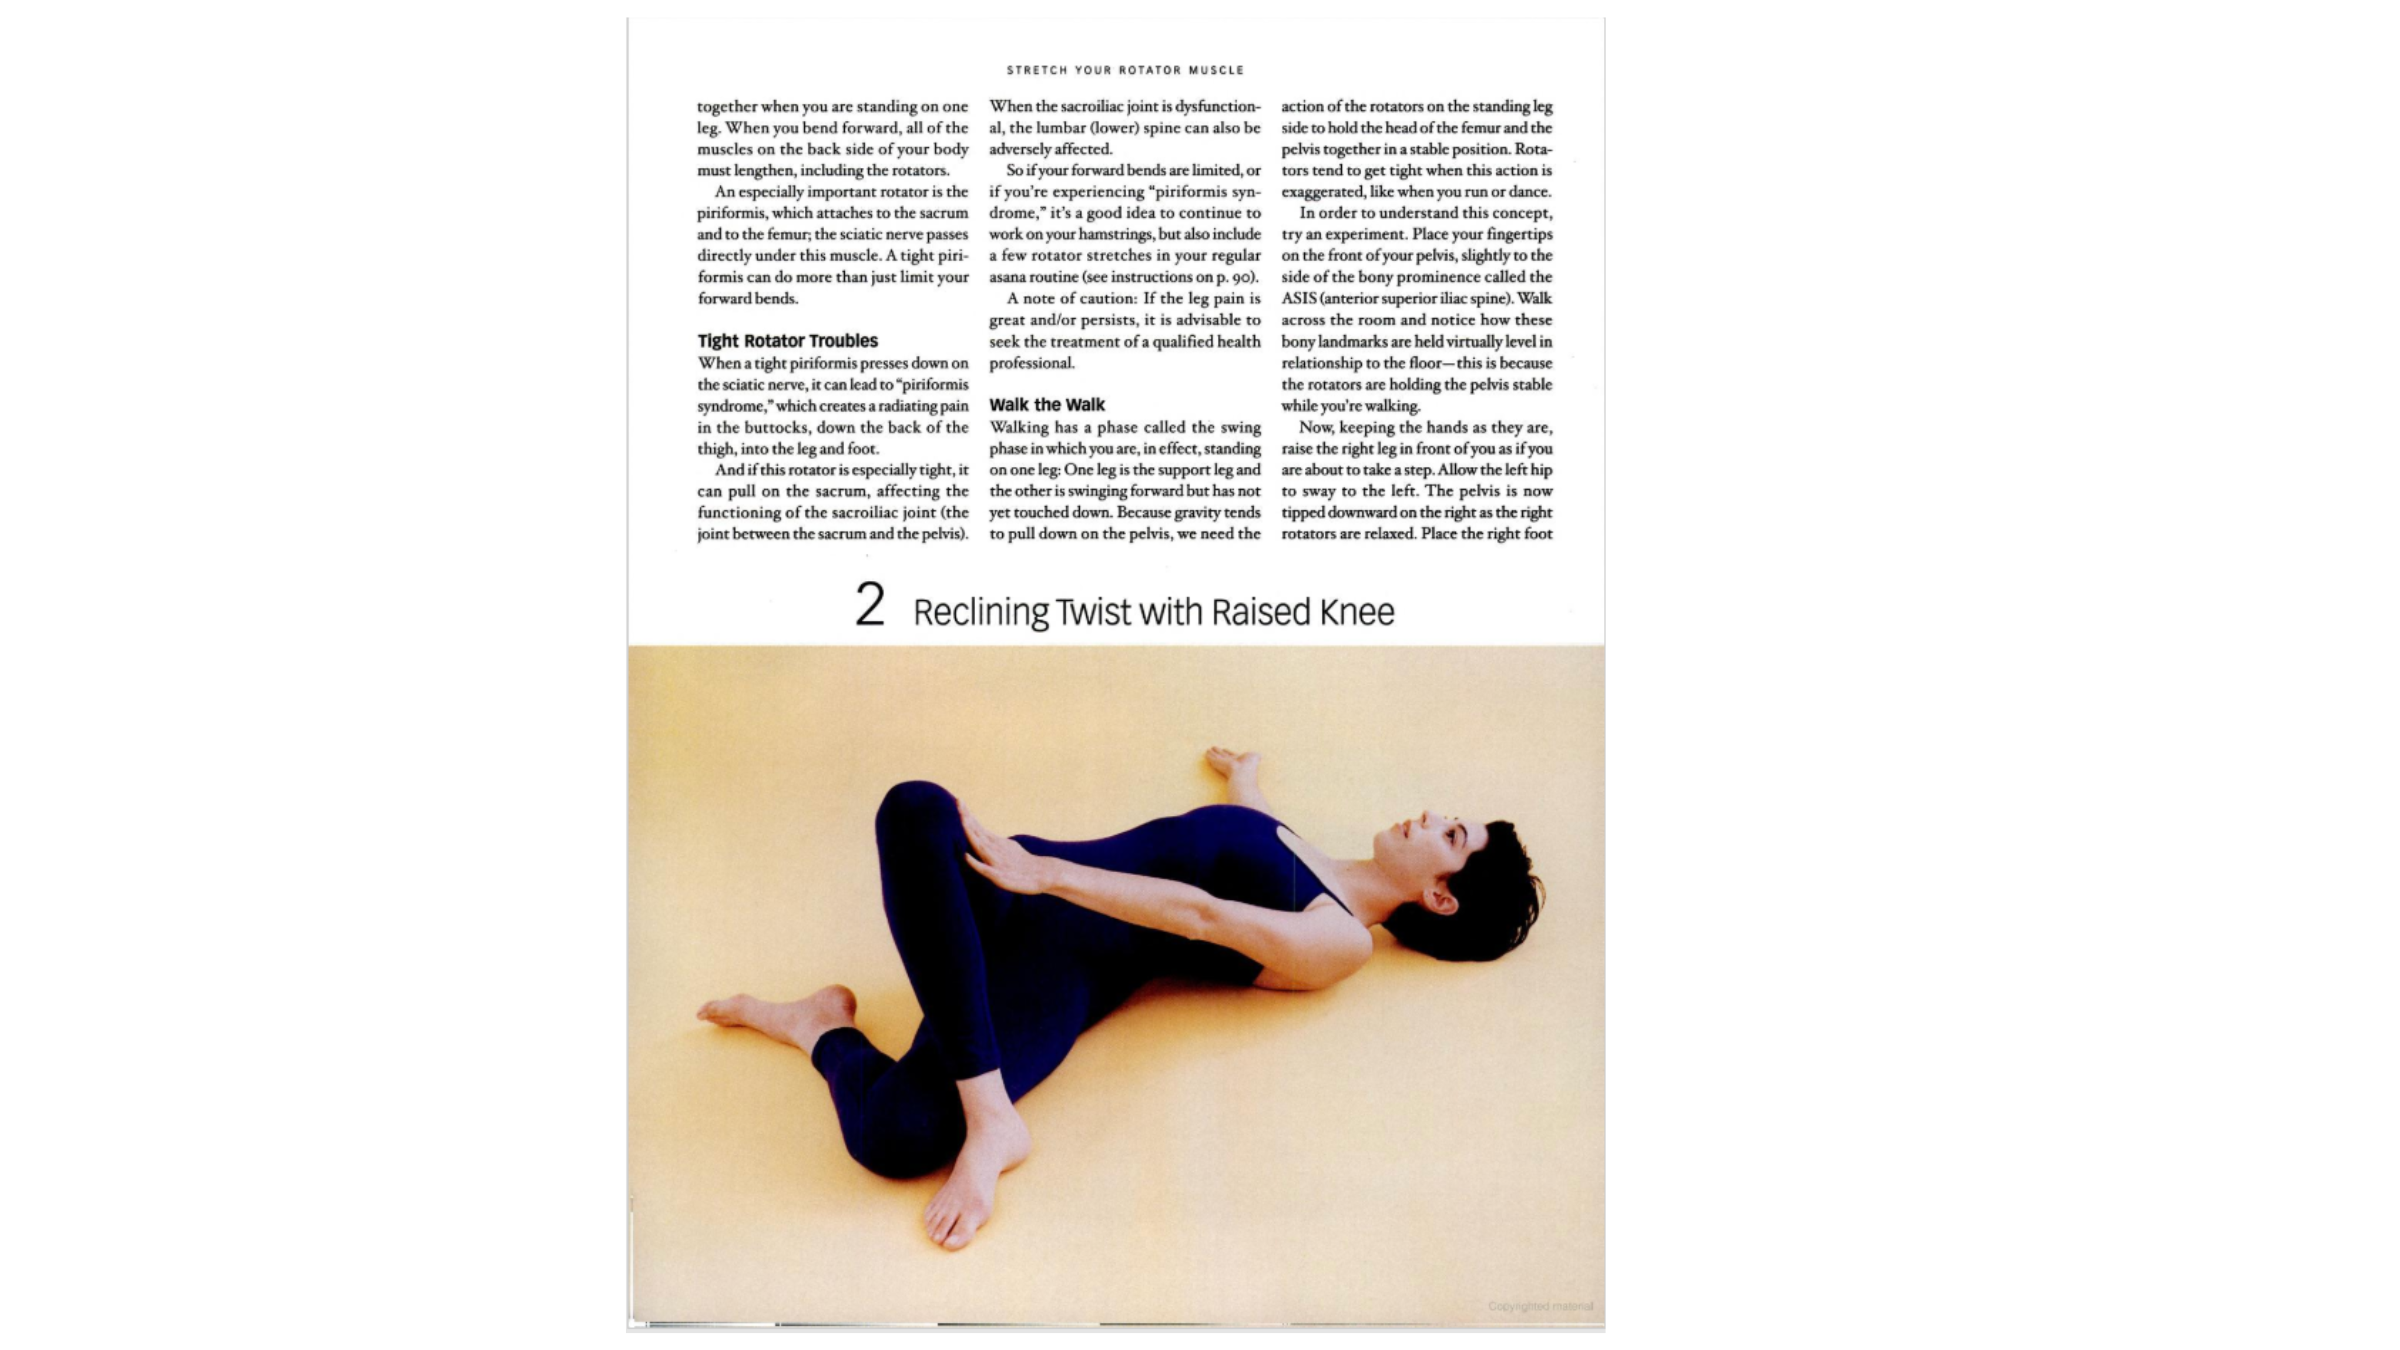
2. Lie down with the knee raised
How to: Lie on your back with your knees bent and feet on the floor. Cross your right ankle over your left knee. Inhale. As you exhale, drop your legs to the left, placing your right foot on the floor and keeping your shoulders on the floor. To increase the stretch, gently push your right knee away from you with your left hand. This should intensify the stretch in the outer right hip. If you don’t feel this stretch, try placing on your right foot; You may need to bring it closer to the hip or move it toward the knee on the floor.
Repeat on the left side.
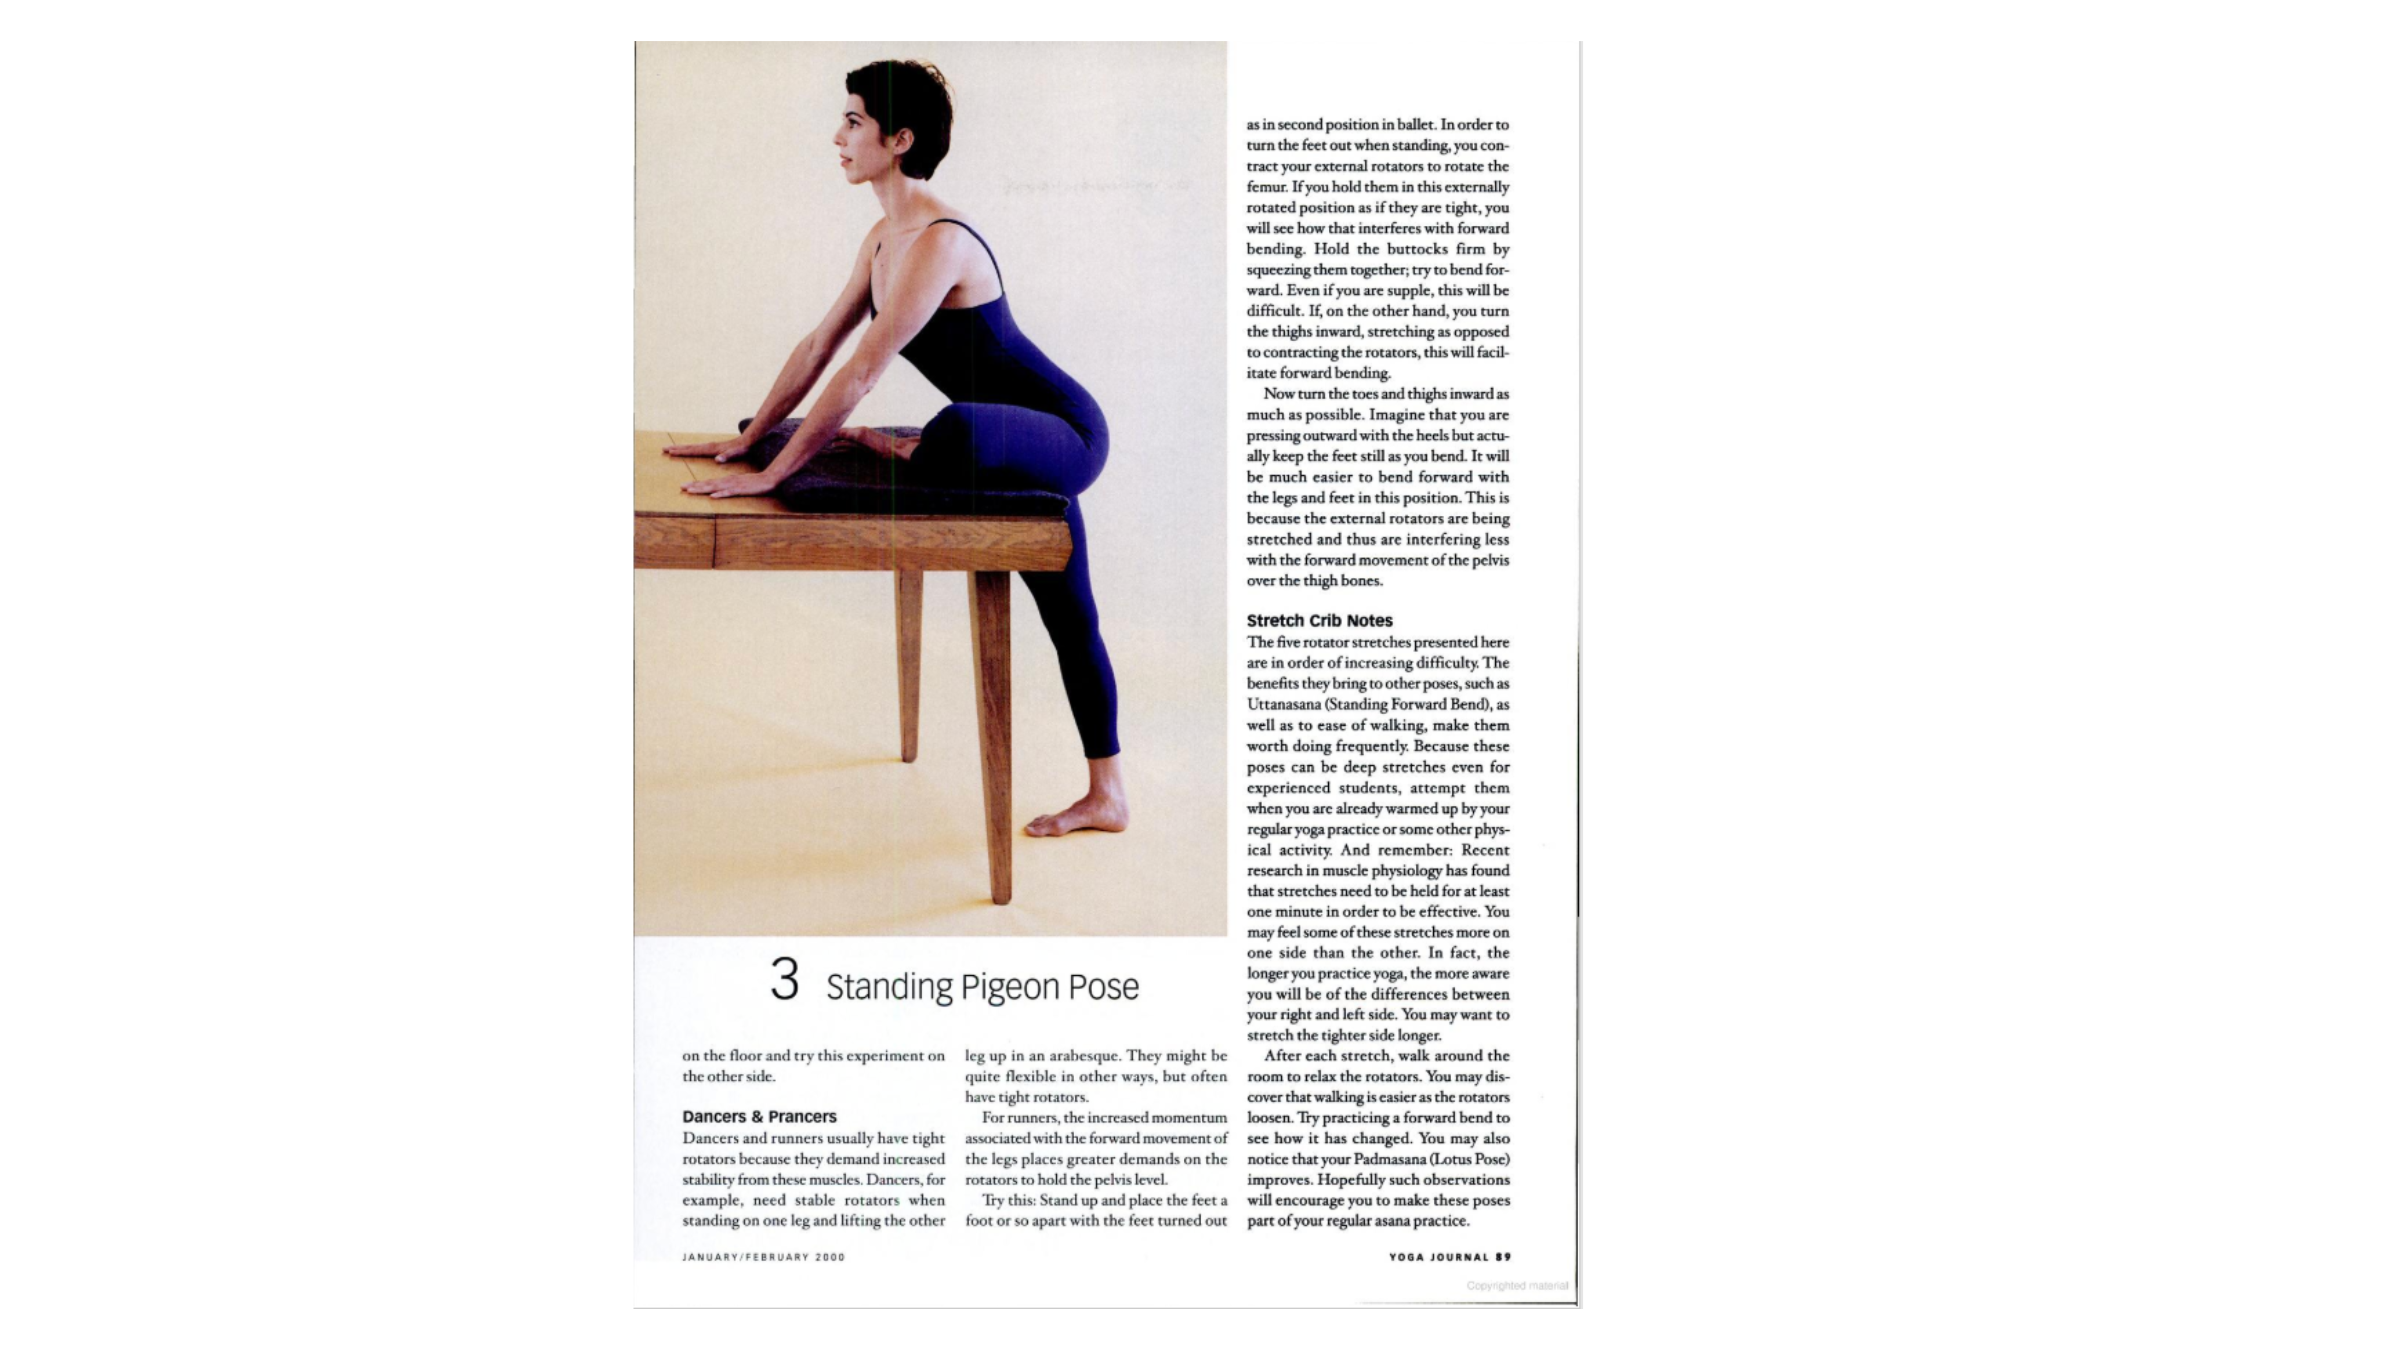
3. Standing bathroom position
How to: Place a blanket along the end of a stable table at waist height. Lift your left leg on the table with the knee bent. The leg and thigh should form a 90 degree angle. Keep your shins parallel to the far end of the table. Ideally, your feet and knees should be resting on the table. If you find this too difficult, try a shorter schedule. You should feel a stretch in the outside of the hip and buttocks of the left leg pigeon.
If you don’t feel much of a stretch, lean forward as you exhale, making sure not to move your standing leg and knee. It is important that the forward bend comes from the hip joints. If you move from your hip joints, you should not feel a strong stretch in your back. If you bend from the spine, you will compress the lower back, and not extend the rotators. You can increase the stretch of this pose by moving the supporting leg away from the table or moving the foot on the table away from your body. Repeat with the right leg on the table.
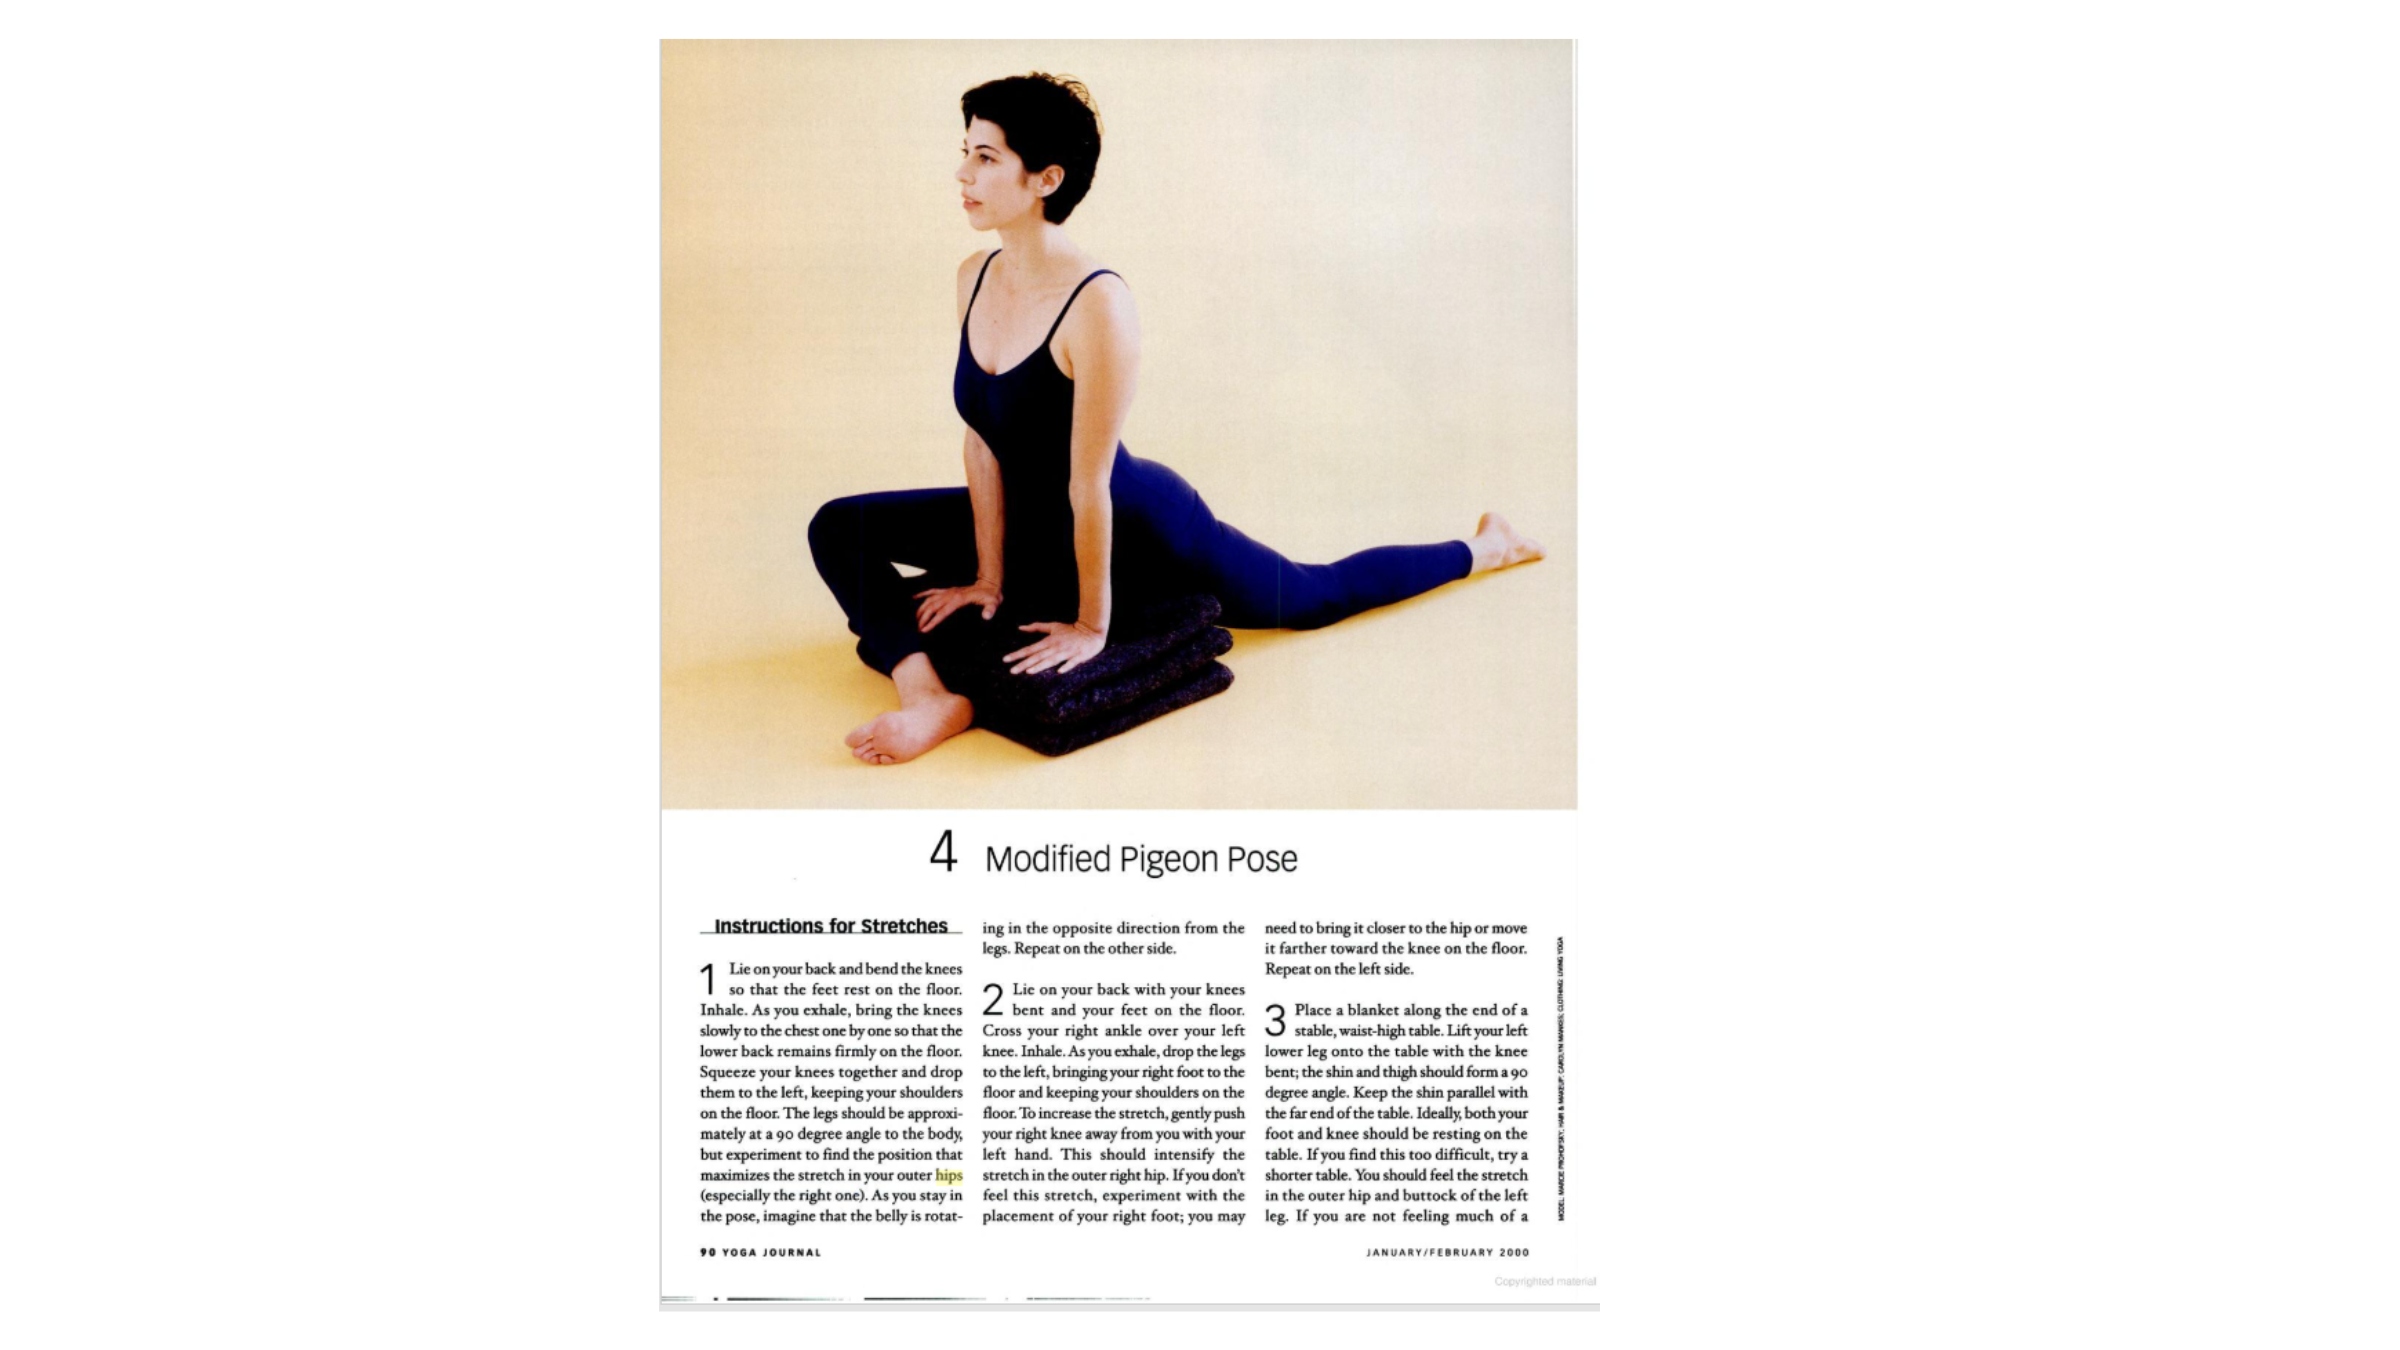
4. Modified pigeon pose
How to: Start in Downward facing dog (Adu Mukha Svanasana). Move your right foot forward between the hands so that you are in a lunge position. Place your left knee on the floor. Move your right foot so that it is exactly in the middle of your hands. Make sure the right leg is perpendicular to the floor. As you exhale, let the right knee drop to the right side. You will need to move your right arm out of the way. Place it where you need it for balance and then move your left leg and torso back so that the angle of the right knee actually opens; You will move your body back slightly as you do this. It is important to keep your right foot slightly bent so that you place your weight on the outside edge of your foot and not your ankle.
Some students will be able to bring their left thigh and right buttocks to the floor, as in splits. Use bolsters or blankets for support if you can’t reach the floor. As you allow the body to fall, keep the middle of your pubic bone exactly in line with your right heel.
Most students, when they feel a deep stretch in their right rotators in this pose, will move their pelvis to the right. It is better to keep the body slightly higher and towards the left than to move the pelvis to the right side. After several breaths, repeat this pose on the left side.
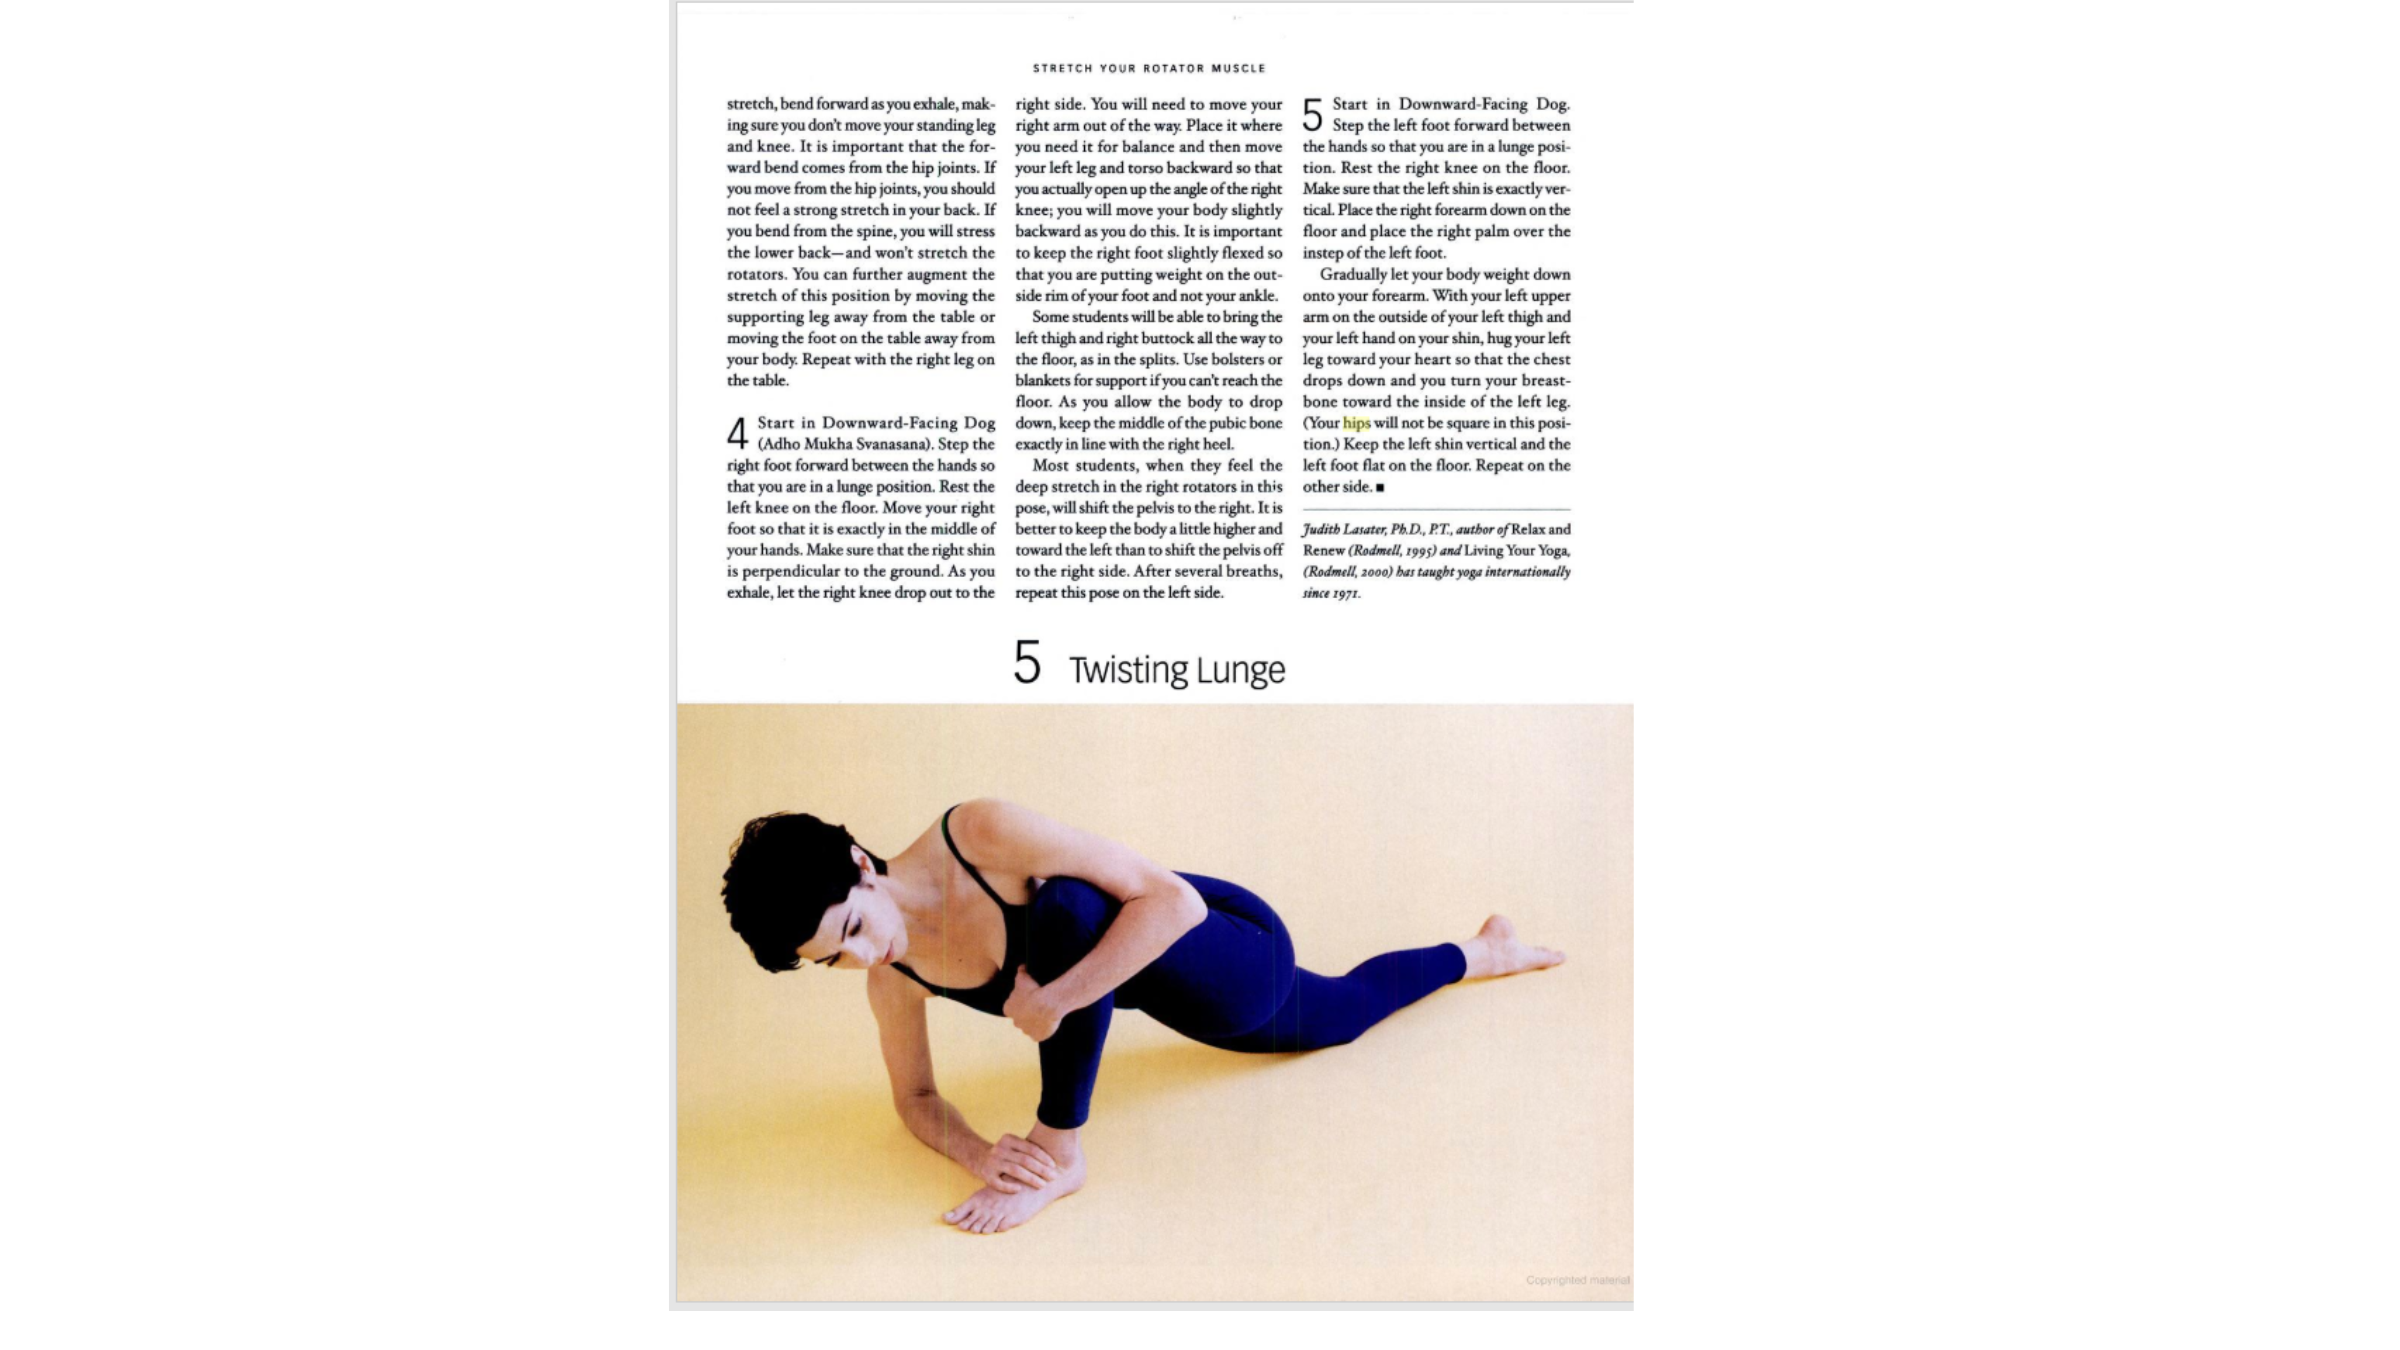
5. Twisting lunge
How to: Start in downward facing dog. Step the left foot forward between the hands so that it is in position Lunge position. Place your right knee on the floor. Make sure the left leg is completely vertical. Place your right forearm on the floor and place your right palm on the instep of your left foot.
Let your body weight gradually fall onto your forearm. With your left arm on the outside of your left thigh and your left hand on your leg, hug your left leg toward your heart so that your chest falls down and your breastbone is turned toward the inside of your left leg.
(Your hip will not be square in this position.) Keep your left leg vertical and your left foot flat on the floor. Repeat on the other side.